


How to add CI to your Frontend with GitHub Actions - NuxtJS case study


In this post I want to show you how easy it is to start with continuous integration with the help of GitHub Actions.
Introduction
Before we start it would be nice to review the concepts we are going to talk about in the post.
What is Continuous Integration
Continuous Integration (CI) is a development practice where developers integrate code into a shared repository frequently. The ideal case is that each integration (merge), can be verified by an automated build and tests.
What is GitHub Actions and GitHub workflow
GitHub Actions help you automate your software development workflows in the same place you store code, https://github.com/. And, also, collaborate on pull requests and issues. With them you can build end-to-end CI and continuous deployment (CD) capabilities directly in your repository.
You can create your own actions, or use and customize actions shared by the community, take a look at the marketplace.
Workflows are custom automated processes, a combination of individual tasks (actions), that you can set up in your repository to build, test, package, release, or deploy any project.
To configure your own workflow, you must create a YAML file in your repository and define when to execute these actions, for example, in a push to master.
Since I am creating an open source project right now, it is crucial to have a working CI by the time we all start working together. Why? Because that way we will all work with the same standards and guidelines, being required to pass those conditions in order to integrate our code.
But I must also say that after having seen how easy it can be to set it up, from now on I plan to use it in all my projects. I hope that you will feel the same when you finish this post 💜
Prepare your project
In order to configure the workflow, which will allow us to automate the continuous integration process, we first need to have ready in our project the actions we want to perform.
In my case, I want to make sure that the rules configured in ESLint and the unit tests in Jest pass in each integration. To do this, I have created the following scripts in package.json:
"lint": "eslint --ext .js, .vue --ignore-path .gitignore ."
"test:unit": "jest"
Also, as I want to check that my project works in different operating systems, I needed to add the .gitattributes file to my project to avoid incompatibility with the newlines format between OS:
# Enforce Unix newlines
* text=auto eol=lf
Setting up our own workflow
For this article, I'm going to explain the Is!MyBug's *configuration made in NuxtJS, but it can be applied to any JavaScript project since they are built in the same environment (Node*).
To start creating the YAML file we have two options:
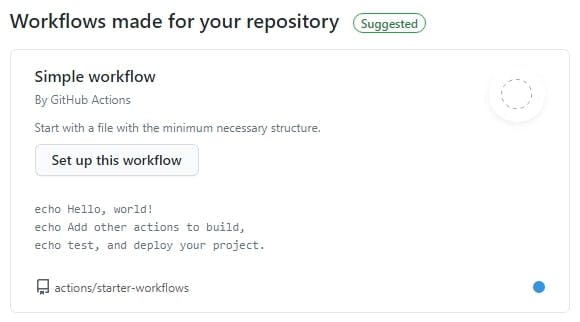
Go to our GitHub repository and click on the Actions tab, there you'll see suggestions for Workflows that can help you to get started. You can select the one that best suits your project and click on the Set up this workflow button.
Create a folder called .github and add the workflows folder inside it. Create the YAML file with the name CI, or the one you choose.
Both options will end with a YAML file in the path .github/workflows/CI.yml.
Let's start with the configuration of the CI.yml file.
First we must give it a name and choose the events in which we want our workflow to run:
# Name your workflow
name: CI

# Set on which events you want run the actions.
# In this case the workflow will run on push for master and on pull request for master and develop branches
on:
  push:
    branches: [ master ]
  pull_request:
    branches: [ master, develop ]
The workflow which runs each time we make a PR to master or develop is made up of one or more jobs that can run sequentially or in parallel.
A workflow job is a set of steps that execute on the same runner, being runner the hosted virtual environments that GitHub provide us to run a job.
Although it also gives us the possibility of doing so in our own self-hosted environment.
As I wanted to run my project in different operating systems (Windows, Linux and MacOS) with the same node version, I used a strategy that creates a build matrix for jobs.
jobs:
  # This workflow contains a job called "integration"
  integration:
        # A strategy that defines different variations of an environment to run each job in.
    strategy:
      matrix:
        os: [ubuntu-latest, macos-latest, windows-latest]
        node: [12]
    # The runners that the job will run on
    runs-on: ${{ matrix.os }}
Once we have the runners set up, we can now start defining the steps we want to follow in the integration job.
A step can run commands, run setup tasks, or run an action in your repository. In each step we will define some properties as:
- name, to display on GitHub
- uses, to specify the action to run, and with, to pass the key/value pairs defined by the action
- if, to prevent a step from running unless a condition is met
- run, to run commands on the OS shell
As I told you before, I want to check if my ESLint configuration is fulfilling as expected and the unit tests are passing. Let's see the steps needed to achieve it:
First we need to setup Node.js.
To add Node.js to my environment I used the action setup-node, verified by GitHub, passing the node-version with the parameter node defined in the matrix we saw above.
So when we have to change the node version we have to do it only in one place.
Once node is set up, we need that the workflow have access to our repository, for that we use the action checkout.
  jobs:
    integration:
          # ...
      # Steps represent a sequence of tasks that will be executed as part of the job
      steps:
        - name: Setup Node.js environment
          uses: actions/setup-node@v1.4.3
          with:
            node-version: ${{ matrix.node }}

        - name: Checkout master branch
          uses: actions/checkout@v2
Then let's install our npm dependencies
To install the dependencies it's just as simple as adding a step to run npm install command.
But since we want to do it in an effective way, let's add some cache to our node_modules. For that, I added the cache action specifying the folder path to be cached (node_modules) and an explicit key for restoring and saving the cache (package-lock.json).
Using the if conditional available in the steps we can check if the output of this cache action (cache-hit - a boolean to indicate a match key), is true or false and then proceed or avoid the command run.
  jobs:
    integration:
          # ...
      # Steps represent a sequence of tasks that will be executed as part of the job
      steps:

        # ... Before steps ...

        - name: Cache node_modules
          uses: actions/cache@v2.1.0
          with:
            # A list of files, directories, and wildcard patterns to cache and restore
            path: node_modules
            # An explicit key for restoring and saving the cache
            key: ${{ matrix.os }}-node-v${{ matrix.node }}-deps-${{ hashFiles(format('{0}{1}', github.workspace, '/package-lock.json')) }}

        - name: Install dependencies
          if: steps.cache.outputs.cache-hit != 'true'
          run: npm install

        # ... After steps ...
Check ESLint and Unit tests
This time, with just commands we can be sure that ESLint and the tests will pass correctly.
We will create a step to run the command: npm run lint, and one for: npm run test:unit, each step will give a negative or positive answer, if it gives an error or not to run the command.
In addition, as we have done tests, we are especially excited to show the code coverage we have achieved. That's why we use the action: codecov/codecov-action. By using it, the https://www.codecov.io/ website will have a history of our pull request with the increase or decrease of coverage. It also allows us to show the percentage of coverage in our readme.md, adding:
<img src="[https://codecov.io/gh/](https://codecov.io/gh/)<GitHub_name>/<GitHub_repo>/branch/master/graph/badge.svg?token=<your_token>" />It will be look as:

  jobs:
    integration:
          # ...
      # Steps represent a sequence of tasks that will be executed as part of the job
      steps:

        # ... Before steps ...

        - name: Run ESLint
          run: npm run lint

        - name: Run unit tests
          run: npm run test:unit

        - name: Code coverage
          uses: codecov/codecov-action@v1.0.12
Once we have seen each section of a workflow separately, here I leave you the complete CI.yml file so you can use it in all your projects!
# Name your workflow
name: CI

# Set on which events you want run the actions.
# In this case the workflow will run on push for master and on pull request for master and develop branches
on:
  push:
    branches: [ master ]
  pull_request:
    branches: [ master, develop ]

jobs:
  # This workflow contains a job called "integration"
  integration:
        # A strategy that defines different variations of an environment to run each job in.
    strategy:
      matrix:
        os: [ubuntu-latest, macos-latest, windows-latest]
        node: [12]
    # The runners that the job will run on
    runs-on: ${{ matrix.os }}

    # Steps represent a sequence of tasks that will be executed as part of the job
    steps:
      - name: Setup Node.js environment
        uses: actions/setup-node@v1.4.3
        with:
          node-version: ${{ matrix.node }}

      - name: Checkout master branch
        uses: actions/checkout@v2

      - name: Cache node_modules
        uses: actions/cache@v2.1.0
        with:
          # A list of files, directories, and wildcard patterns to cache and restore
          path: node_modules
          # An explicit key for restoring and saving the cache
          key: ${{ matrix.os }}-node-v${{ matrix.node }}-deps-${{ hashFiles(format('{0}{1}', github.workspace, '/package-lock.json')) }}

      - name: Install dependencies
        if: steps.cache.outputs.cache-hit != 'true'
        run: npm install

      - name: Run ESLint
        run: npm run lint

      - name: Run unit tests
        run: npm run test:unit

      - name: Code coverage
        uses: codecov/codecov-action@v1.0.12
I hope it has been helpful and that you do not leave this post without having learned something new. Thanks for reading it and if you have any doubts you can ask me in https://twitter.com/dawntraoz
If you want to use more badges as the one for the coverage, check this website: https://badgen.net/ (it's amazing!