


In this post I want to tell you how I have configured a droplet in DigitalOcean to be able to publish a Nuxt Full Static site with a good performance.
Before starting
For those of you who don't know DigitalOcean yet, it provides developers cloud services that help to deploy and scale applications that run simultaneously on multiple computers.
You'll see that I mention the word droplet throughout the post. In DigitalOcean, droplets are flexible Linux-based virtual machines (VMs) that run on top of virtualized hardware. So, each droplet you create is a new server you can use.
There are different kinds of droplet plans offered, but we are going to use Standard Droplets, which offer a lot of freedom and flexibility regarding our hosting needs. But first, I recommend you to take a look at the other droplets plans and see what is the best one for your project.
If you don't have an account yet, you can register here: https://cloud.digitalocean.com/registrations/new!
Step 1 - Create your droplet
Now that we know what a droplet is, let's create our own 🎉
Go to Create > Droplets in the top right menu.
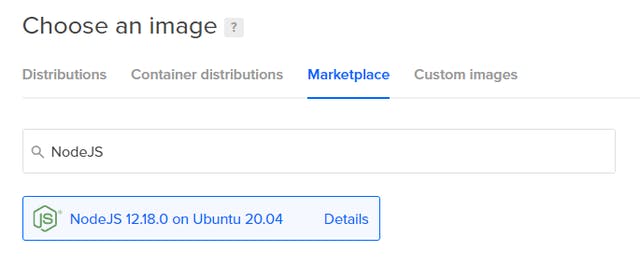
Choose an image
In this case, as we are going to deploy our favorite framework NuxtJS, we will need the NodeJS image. Go to Marketplace and type NodeJS in the search input, select the latest version available.
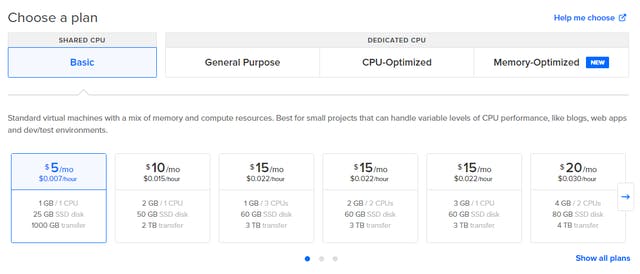
Choose a plan
You will have to take into account the scalability of your project and the capacity you need for it.
In our case, for IS ! MY BUG, we have decided to try a standard droplet ($10/month it might be enough).
Choose a datacenter region
In this section it is best to choose the region where you want your website to have the best performance, where your target audience is.

Authentication
This is the option that will defined how you will connect with your droplet.
We recommend to use SSH keys, for security purposes
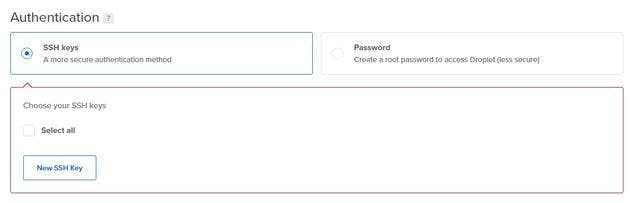
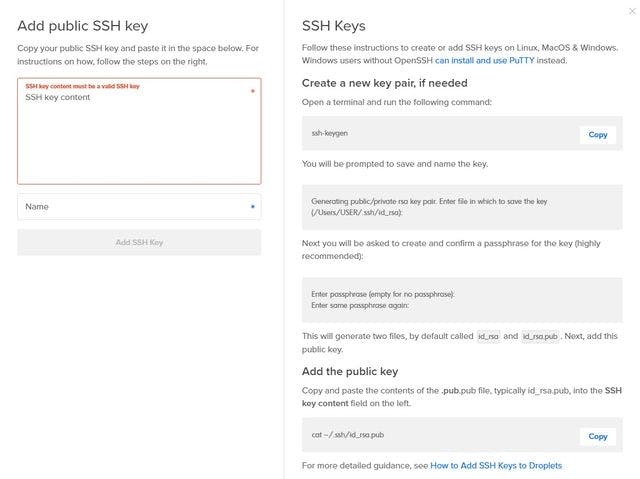
When creating your New SSH Key, you'll need to follow the tutorial inside the modal and, then, add the public key (id_rsa.pub) generated inside the textarea.
Once you have completed all the options, give it a name and press the create button.

Now, our Droplet is ready!! 💜
Step 2 - Add your own domain
If you already have a purchased domain, let's add it to DigitalOcean. Otherwise you will need to buy one first.
Go to Create > Domains/DNS in the top bar menu, it will open the Networking page with Domains tab selected.
Then, type your domain into the Enter domain input and click the Add Domain button.

Once you've added a domain, click its name to view and modify its DNS records.
You will see 3 NS-type records by default. To add this domain to your droplet you will need 2 A-type records:
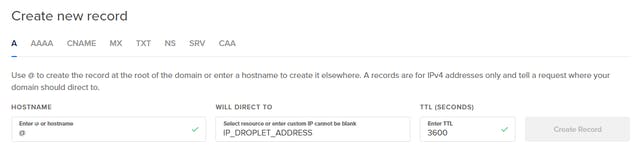
- One with @ as a hostname (will be equivalent to your domain.io) directing to your droplet (by IP)
- Another with www as a hostname (will create a subdomain domain.io) directing to your droplet again.
Now everything is ready to start working in our droplet. You can check if the domain is working with the following command ping domain.io, you must see your droplet IP address.
If you have any problems related to the DNS management I recommend you to take a look at How to Create, Edit, and Delete DNS Records.
Step 3 - Connect to your droplet by SSH
To connect to your Droplet by SSH, you'll need to open a terminal. It depends on the operating system you're using, but generally:
- Linux: Search Terminal or press
CTRL+ALT+T. - macOS: Search Terminal.
- Bash on Windows: Search Bash. If you don't have Bash on Windows, you can just install git and you will have Git Bash included, ready to use.
Now that you have a terminal open, you will have to connect through this command:
ssh root@DROPLET_IP_ADDRESS
When you finished creating your droplet an IP address would be generated, that's the one you have to use after the @.
In case you have more than one SSH keys, you may need to specify the path of your private key using the -i flag:
ssh -i /path/key username@DROPLET_IP_ADDRESS
If everything has gone well and we have created a passphrase, as the guide recommends, now it is time to add it in:
Enter passphrase for key '/c/Users/USER/.ssh/key':
Now we are connected to our droplet 🙌, we will see root@DROPLET_NAME if everything went well. Otherwise you can consult this more detailed guide from DigitalOcean team.
Step 4 - Configure NGINX to run our NuxtJS project
Good news, in our droplet NGINX is already installed, we just need to configure the server to run our static site when it is generated. Let´s see how it works!
Create a domain folder
Add a folder in
/var/www/with the same name as our domain:cd /var/www/ mkdir domain.ioInside the domain folder, we will need to have another one called html (this folder will contain our code):
  cd /var/www/domain.io
  mkdir html
Create a domain NGINX configuration
To start configuring NGINX for our domain, let's copy the default site available to a file named as our domain:
  cd /etc/nginx/sites-available/
  cp default domain.io
  sudo nano domain.io
When you open the copied file you will see something like this:
  server {
      listen 80 default_server;
      listen [::]:80 default_server;

      root /var/www/html;

      index index.html index.htm index.nginx-debian.html;

      server_name hellonode;

      location ^~ /assets/ {
          gzip_static on;
          expires 12h;
          add_header Cache-Control public;
    }

      location / {
      ...

      proxy_pass http://localhost:3000;
    }
  }
We will need to modify, add and delete the following content:
- First, change
root /var/www/html;toroot /var/www/domain.io/html/dist;andserver_name hellonode;toserver_name domain.io www.domain.io;. - Then, remove
location ^~ /assets/ { }and the content insidelocation /. At the end, add below
server_name:error_page 404 /200.html;Now, you will have:
server {
  listen 80 default_server;
  listen [::]:80 default_server;

  root /var/www/domain.io/html/dist;

  index index.html index.htm index.nginx-debian.html;

  server_name domain.io www.domain.io;

  error_page 404 /200.html;

  location / {
}
}
This file needs to be also in sites-enabled and the default will be removed, for that you need to run the following commands:
// Create a symbolic link to have the same content in both
sudo ln -sf /etc/nginx/sites-available/domain.io /etc/nginx/sites-enabled/domain.io
rm /etc/nginx/sites-available/default /etc/nginx/sites-enabled/default
Finally, to see the changes already done we need to restart NGINX, run:
sudo nginx -t // Test configuration
sudo nginx -s reload
As we don't have any project there yet, we will see a 404 error, we are almost there. Let's configure our project in the next step!
- First, change
Step 5 - Deploy Automation using git
In order to upload our code to the droplet using a git command and thus automate the process, we can create a githook (or you can use Github Actions).
In this case I will show you how to upload your project configuring a githook:
Initiate a repository
In the folder that will contain our static site's files. We need to initialize a git repo inside:
  cd /var/www/domain.io/html
  git init
Create a repobare folder
Now, go back to the
domain.iofolder and create the repobare folder,cd .. mkdir repobarego to repobare and initiate a bare repo:
  cd repobare
  git init --bare
We will need to create a githook that will intercept our commits and push the files to our domain.io/html folder.
sudo nano hooks/post-receiveAdd to the post-receive githook, the content below:
- The first command will add to the html folder the content pushed from our repository.
The last commands will go to that folder, install dependencies and generate the dist folder with your static site files.
#!/bin/bash
git --work-tree=/var/www/domain.io/html --git-dir=/var/www/domain.io/repobare checkout -f
cd /var/www/domain.io/html
npm install
npm run generate
Then save post-receive file and give it permission to be executed:
sudo chmod +x hooks/post-receive
Create a new origin in your local repo
In order to keep our origin intact, we are going to create a new origin with the name we want, replacing with the chosen name.
Go to your local repository and run the following commands:
  git remote add <deploy_origin> root@<DROPLET_IP_ADDRESS>:/var/www/domain.io/repobare
  git add .
  git commit -m "First commit"
  git push <deploy_origin> master
When you run
git pushit will ask you for the SSH passphrase, fill in and press Enter.Now, everything is in your
domain.io/htmlfolder and build it 👏 Check your result in the browser you like the most 🎉
Appendix - Improve performance
1. SSL Certification
The first step will be obtain an SSL Certificate. To do it we will use Let’s Encrypt, as DigitalOcean recommend us in this post. For that, we will install the Certbot software on our droplet.
Install Certbot and it's Nginx plugin with apt:
sudo apt install certbot python3-certbot-nginx
Certbot is now ready to use, and we already have Nginx’s configuration ready for it.
So, we just need to run the command below to obtain the same certificate for both domains.
sudo certbot --nginx -d www.domain.io -d domain.io
If this is your first using certbot, enter the email address associated with your domain (i.e. info@domain.io) and agree to the terms of service.
If everything works fine, certbot will ask to choose the configuration of HTTPS settings (I chose 2: Redirect).
Output
Please choose whether or not to redirect HTTP traffic to HTTPS, removing HTTP access.
- - - - - - - - - - - - - - - - - - - - - - - - - - - - - - - - - - - - - - - -
1: No redirect - Make no further changes to the webserver configuration.
2: Redirect - Make all requests redirect to secure HTTPS access...
- - - - - - - - - - - - - - - - - - - - - - - - - - - - - - - - - - - - - - - -
Select the appropriate number [1-2] then [enter] (press 'c' to cancel): 2
Now, the certificate is downloaded, installed, and loaded, you can check your website using https://.
It includes a renewal process, if you want to test it go to Verifying Certbot Auto-Renewal.
2. Cache Policy
Let's configure Cache-Control and Expires Headers in the domain.io we created before in NGINX sites-available folder.
sudo nano /etc/nginx/sites-available/domain.io
Add 2 new sections:
- Before the server block, the cache's duration of each file type.
- Inside the server block, the caching headers settings.
# Expires map
map $sent_http_content_type $expires {
    default                    off;
    text/html                  epoch;
    text/css                   max;
    application/javascript     max;
    ~image/                    max;
}

server {
    ...

    expires $expires;

        root /var/www/domain.io/html/dist;
...
To enable the new configuration, restart NGINX.
sudo nginx -s reload
And run the next command below to be sure the new config is working and you see Expires: Thu, 01 Jan 1970 00:00:01 GMT and Cache-Control: no-cache.
curl -I https://domain.io/index.html
If you want more information about it, go to How to Implement Browser Caching.
3. Accept Encoding
To change the server gzip configuration, edit nginx.config file:
sudo nano /etc/nginx/nginx.conf
Find the gzip settings section and modify:
- Uncomment every commented line to enable the additional settings.
- Add gzip_min_length to 256 and gzip_types with the formats you want to encode.
...
##
# `gzip` Settings
#
#
gzip on;

gzip_vary on;
gzip_proxied any;
gzip_comp_level 6;
gzip_buffers 16 8k;
gzip_http_version 1.1;
gzip_min_length 256;
gzip_types text/plain text/css application/json application/javascript text/xml application/xml application/xml+rss text/javascript application/vnd.ms-fontobject application/x-font-ttf font/opentype image/svg+xml image/x-icon;
...
That's it! To enable the new configuration, reload Nginx again.
sudo nginx -s reload
And run the next command below to be sure the new config is working:
curl -H "Accept-Encoding: gzip" -I https://domain.io/index.html
If you want more information about it, go to How To Add the gzip Module to Nginx.
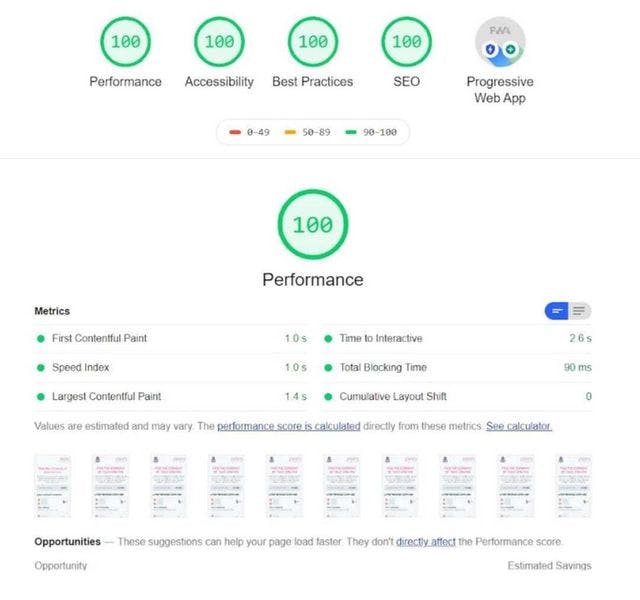
Results
After adding this configuration to our project IS!MYBUG, the results are just unbelievable 😍 We're in shock!!
I hope you spend a good time reading it and it solves any doubt you may have when you decide to use DigitalOcean for your Nuxt Full Static sites. Thank you for getting here and, as always, any feedback is very welcome!! 💜🎉